Create new flutter project
Android studio와 같은 IDE를 이용해 새로운 flutter 프로젝트를 만들 경우 lib 폴더의 main.dart 파일 안에 자동으로 다음과 같은 코드가 작성되어 있는것을 확인 할 수 있습니다.
import 'package:flutter/material.dart';
void main() {
runApp(const MyApp());
}
class MyApp extends StatelessWidget {
const MyApp({super.key});
Widget build(BuildContext context) {
return MaterialApp(
title: 'Flutter Demo',
theme: ThemeData(
useMaterial3: true,
),
home: const MyHomePage(title: 'Flutter Demo Home Page'),
);
}
}
class MyHomePage extends StatefulWidget {
const MyHomePage({super.key, required this.title});
final String title;
State<MyHomePage> createState() => _MyHomePageState();
}
class _MyHomePageState extends State<MyHomePage> {
int _counter = 0;
void _incrementCounter() {
setState(() {
_counter++;
});
}
Widget build(BuildContext context) {
return Scaffold(
appBar: AppBar(
backgroundColor: Theme.of(context).colorScheme.inversePrimary,
title: Text(widget.title),
),
body: Center(
child: Column(
mainAxisAlignment: MainAxisAlignment.center,
children: <Widget>[
const Text(
'You have pushed the button this many times:',
),
Text(
'$_counter',
style: Theme.of(context).textTheme.headlineMedium,
),
],
),
),
floatingActionButton: FloatingActionButton(
onPressed: _incrementCounter,
tooltip: 'Increment',
child: const Icon(Icons.add),
),
);
}
}(코드를 한 눈에 보기 위해 주석은 제거 했습니다.)
처음 Flutter 프로젝트를 만들고 이 코드를 접했을 땐 생각보다 코드가 이해가 되지 않아 당황스러웠습니다.(분명 Dart 문법은 어느 정도 익혔다고 생각했는데..)
StatelessWidget이 뭐지? super.key는 또 뭐지? BuildContext는 또 무슨 타입이지? StatefulWidget은 StatelessWidget이랑 다르게 바로 build를 안하네? 와 같은 질문들이 꼬리에 꼬리를 물면서 생겨났습니다.
사실 위 코드가 이해되지 않는 이유는 Dart를 몰라서가 아니라 Flutter를 몰라서입니다.
코드를 한 줄 한 줄 따라가며 위의 코드가 어떤 의미인지 Flutter 소스코드를 보며 이해해보도록 합시다.
void main()
모든 dart 프로그램은 main 함수를 갖습니다. 프로그램의 진입점 역할을 하는 함수입니다.
runApp() 함수는 Widget을 argument로 받아 화면에 해당 Widget 을 그려주는 역할을 하는 함수입니다.
보통은 위처럼 어플리케이션의 최상단에서 컨테이너의 역할을 하는 Widget을 넣어줍니다.
class MyApp extends StatelessWidget
MyApp 클래스는 StatelessWidget을 상속받고 있습니다.
StatelessWidget은 무슨 클래스일까요?
StatelessWidget
abstract class StatelessWidget extends Widget {
const StatelessWidget({super.key});
StatelessElement createElement() => StatelessElement(this);
Widget build(BuildContext context);
}StatelessWidget은 Widget을 상속 받고 있는 추상 클래스군요.
따라서 일반적인 클래스처럼 인스턴스화 하여 사용하는 용도가 아니라 StatelessWidget을 상속받는 하위 클래스에서 body 없이 이름만 덩그러니 선언되어 있는 메서드들의 구체적인 구현을 해주겠구나 짐작이 가능하겠습니다.
현재 MyApp이 StatelessWidget을 상속받고 있고 Widget build(BuildContext context)를 overriding 하고 있는 것을 확인 할 수 있습니다.
Widget build(BuildContext context) {
return MaterialApp(...) // MarerialApp이라는 Widget을 return 하는군요.
}Question :
createElement()메서드는 MyApp에서 override 하지 않는데 왜 그런거죠?Answer :
createElement()메서드는 body가 있는 메서드입니다.특별한 경우가 아니라면 StatelessWidget을 상속받는 하위 클래스에서는 이 메서드를 따로 정의해주지 않는 것이 일반적입니다.
createElement()메서드는 Widget(blueprint 역할)을 받아 실제 화면에 그려지는 Element를 반환해주는 함수입니다.
StatelessWidget이 어떤건지는 알겠으니 이제 Widget이 뭔지를 알아봐야겠군요.
Widget
abstract class Widget extends DiagnosticableTree {
const Widget({this.key}); // Initializes key for subclasses.
final Key? key;
Element createElement();
String toStringShort() {
final String type = objectRuntimeType(this, 'Widget');
return key == null ? type: '$type-$key';
}
void debugFillProperties(DiagnosticPropertiesBuilder properties) {
super.debugFillProperties(properties);
properties.defaultDiagnosticsTreeStyle = DiagnosticsTreeStyle.dense;
}
bool operator ==(Object other) => super == other;
int get hashCode => super.hashCode;
static bool canUpdate(Widget oldWidget, Widget newWidget) {
return oldWidget.runtimeType == newWidget.runtimeType
&& oldWidget.key == newWidget.key;
}
static int _debugConcreteSubtype(Widget widget) {
return widget is StatefullWidget ? 1 :
widget is StatelessWidget ? 2 : 0
}
}(코드를 한 눈에 보기 위해 주석은 제거 했습니다.)
Widget은 DiagnosticableTree를 상속받고 있는 추상 클래스이군요..
글이 너무 장황해지는 것 같아 DiagnosticableTree에 대해서는 설명하지 않도록 하겠습니다.(기회가 된다면 다음에..)
그 다음 줄부터 보도록 하겠습니다.
abstract class Widget extends DiagnosticableTree {
	const Widget({this.key});

	final Key? key;

...
}MyApp과 StatelessWidget에서 super.key로 부르던 key가 Widget이 갖고 있던 variable이였군요.
constant constructor의 parameter로 들어가기 때문에 final로 선언되며 Key라는 타입을 갖는 것을 알 수 있습니다.
const Widget({super.key}) // 이 부분은 다음과 같은 의미를 갖는 코드입니다.
// Redirecting to the parent class constructor with named parameter "key"
const Widget({Key? key}): super(key: key)
(물론 두번째 줄 처럼 사용할 경우 IDE가 노란줄로 경고를 줍니다만, 문법적으로 간략하게 되어 있는 부분에는 사실 위와 같은 의미가 있다는 점을 알고 가면 좋을 것 같습니다.)
음.. Key는 또 뭐하는 녀석일까요?
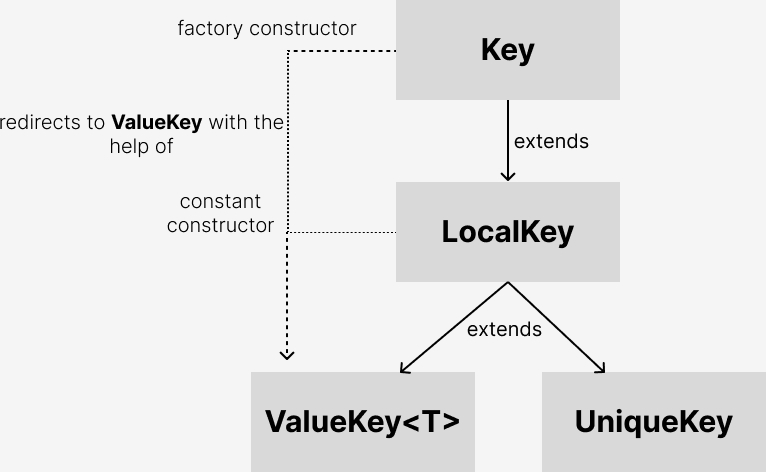
Key
abstract class Key {
const factory Key(String value) = ValueKey<String>;
const Key.empty();
}Key는 constant factory constructor와 constant named constructor를 갖는 abstract class이군요.
factory Key constructor는 String 타입의 value를 받고 ValueKey 타입의 인스턴스를 반환합니다.
factory constructor이기 때문에 아마 ValueKey 은 Key를 상속받는 sub class일 것으로 추측이 됩니다.
ValueKey가 뭔지를 봐야겠습니다.
ValueKey
class ValueKey<T> extends LocalKey {
const ValueKey(this.value);
final T value;
bool operator ==(Object object) {
if (other.runtimeType != runtimeType) {
return false;
}
return other is ValueKey<T> && other.value == value;
}
int get hashCode => Object.hash(runtimeType, value);
String toString() {
final String valueString = T == String ? "<'$value'>" : '<$value>';
if (runtimeType == _TypeLiteral<ValueKey<T>>().type) {
return '[$valueString]';
}
return '[$T $valueString]';
}
}예상과는 다르게 Key를 바로 상속받지 않고 LocalKey를 상속받는 클래스입니다.
Generic type인 T를 받아 value에 저장합니다.
== 연산자를 오버라이딩하여 동등성 비교 로직을 커스텀하여 사용하고 있습니다. runtimeType이 같은지 우선 확인하고 만약 같은 runtimeType이라면 value가 같은지를 확인하여 두 인스턴스가 같은지를 확인하는 로직이군요.
hashCode getter도 오버라이딩 하고 있습니다. runtimeType과 value가 같다면 hashCode가 같을것이라고 예상할 수 있습니다. == 연산자의 로직과 일맥상통합니다.
toString함수도 오버라이딩하여 print 함수를 호출했을 때 보여지는 모습도 커스텀해서 사용하고 있습니다.
ValueKey가 뭔지는 알았으니 LocalKey가 뭔지를 확인해보면 전체적인 그림을 파악할 수 있을 것 같습니다.
LocalKey
abstract class LocalKey extends Key {
	const LocalKey(): super.empty();
}
LocalKey는 Key를 상속받는 또 다른 추상 클래스입니다.
constant constructor 하나만 선언되어있고 Key의 “empty” named constructor로 리다이렉팅하고 있습니다.
Key의 전체적인 상속관계는 다음과 같습니다.
Question:
LocalKey는 굳이 왜 필요한가요? 그냥 바로 ValueKey에서 Key를 상속받아서 사용하면 안되나요?
Answer:
정답은 안된다 입니다.
클래스들간의 상속관계를 지키면서 factory constructor와 constant constructor를 동시에 사용하기 위해서는 LocalKey와 같은 클래스가 반드시 필요합니다.
factory constructor는 const로 선언될 수 없기 때문에 Key를 상속받는 하위 클래스들에서 constant constructor를 사용하기 위해서는 중간에 constant constructor를 갖는 LocalKey와 같은 클래스가 매개해주어야 합니다.
만약 LocalKey없이 바로 상속받아 사용한다면 다음과 같은 에러를 볼 수 있습니다.
abstract class Key {
  factory Key(...);
}

class ValueKey<T> extends Key {
  //The generative constructor 'Key Key(String value)' is expected, but a factory was found.
  const ValueKey(this.value); // This is not allowed.

  final T value;
  ...
}
Widget이 fianl variable로 갖고 있던 key에 대해 어느정도 파악한 것 같습니다.
이제 다시 Widget으로 돌아와서.. 다음 글로 이어집니다!