Cloning Twitter Post UI
Flutter 커뮤니티에서 활발하게 활동하시는 Andrea Bizzotto의 UI challenge 1번 문제입니다.
다음과 같은 트위터 포스트 UI를 클론해보며 Flutter에서 UI 배치에 사용하는 기본적인 widget들을 학습해 보도록 합시다.
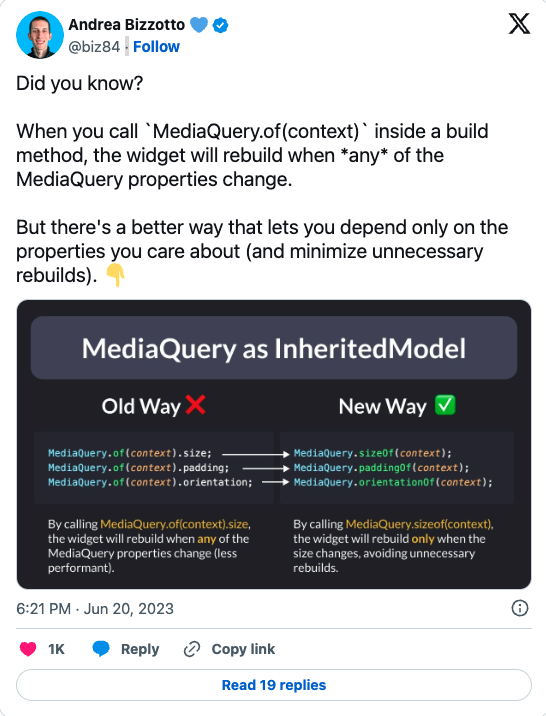
Diagram of the UI
코딩에 들어가기 전에 우선 만들고자 하는 UI가 어떤 구조로 되어있는지 파악할 필요가 있습니다.
구조를 파악할 때는 다음과 같이 어떤식으로 layout을 구성할지 분석하는 것이 좋습니다.
- Row 혹은 Column에 넣을 수 있는게 있을까?
- Grid layout이 필요한 부분이 있을까?
- Stack이 필요한 부분이 있을까?
- Padding, Border, Align이 필요한 부분이 있을까?
위에 언급한 사항들은 Flutter가 기본적으로 제공하는 Widget들입니다.
각각의 layout widget에 대해 간단하게 알아보겠습니다.
Row
A widget that displays its children in a horizontal array.
To cause a child to expand to fill the available horizontal space, wrap the child in an Expanded widget.
The Row Widget does not scroll(and in general it is considered an error to have more children in a Row than will fit in the available room). If you have a line of widgets and want them to be able to scroll if there is insufficient room, consider using ListView.
- Row는 요소들을 가로로 배치하고 싶을 때 사용.
- Row의 요소들은 기본값으로 정해진 공간만을 차지하는데 만약 특정 요소가 Row의 남는 요소를 채우도록 하기 위해서는 Expanded widget를 사용
- 만약 요소들이 Row의 width를 넘어서게 된다면 Flutter는 이를 layout 에러로 취급합니다. 요소들이 Row의 width를 넘을 것 같다면 ListView를 사용
How to use Row
class MyRow extends StatelessWidget {
const MyRow({super.key});
Widget build(BuildContext context) {
return const Row(
mainAxisAlignment = MainAxisAlignment.spaceBetween, // Horizontal
crossAxisAlignment = CrossAxisAlignment.center, // Vertical
children = <Widget>[
Expanded(
flex: 1,
child: Text("Hello"),
),
Icon(Icons.flutter_dash),
Text("Flutter"),
]
)
}
}Column
A widget that displays its children in a vertical array
To cause a child to expand to fill the available vertical space, wrap the child in an Expanded widget.
The Column widget does not scroll(and in general it is considered an error to have more children in a Column than will fit in the available room). If you have a line of widgets and want them to be able to scroll if there is insufficient room, consider using a ListView.
- Column는 요소들을 세로로 배치하고 싶을 때 사용.
- Column의 요소들은 기본값으로 정해진 공간만을 차지하는데 만약 특정 요소가 Column의 남는 요소를 채우도록 하기 위해서는 Expanded widget를 사용
- 만약 요소들이 Column의 width를 넘어서게 된다면 Flutter는 이를 layout 에러로 취급합니다. 요소들이 Column의 width를 넘을 것 같다면 ListView를 사용
How to use Column
class MyColumn extends StatelessWidget {
const MyColumn({super.key});
Widget build(BuildContext context) {
return Column(
mainAxisAlignment: MainAxisAlignment.spaceBetween, // Vertical
crossAxisAlignment: CrossAxisAlignment.start, // Horizontal
children: <Widget>[
Text("Hello"),
Expanded(
flex: 1,
child: Icon(Icons.flutter_dash),
),
Text("Flutter")
]
)
}
}
Expanded
A widget that expands a child of a Row, Column, or Flex so that the child fills the avaialble space.
Using an Expanded widget makes a child of Row, Column, or Flex expanded to fill the available space along the main axis(e.g. horizontally for a Row or vertically for a Column). If multiple children are expanded, the available space is divided among them according to the flex factor.
An Expanded widget must be a descendant of a Row, Column, or Flex, and the path from the Expanded widget to its enclosing Row, Column, or Flex must contain only StatlessWidget or StatefulWidgets(not either kinds of widgets, like RenderObjectWidgets).
- Expanded 는 Row, Column 혹은 Flex와 같은 layout widget의 자식요소로 사용.
- 부모 layout widget의 남는 공간을 Expanded가 차지함.
- 만약 여러 Expanded 2개 이상이라면 flex값에 따라 우선순위를 정함(높은 값일수록 많은 공간을 차지)
How to use Expanded
class MyExpandedRow extends StatelessWidget {
MyExpanded({super.key});
Widget build(BuildContext context) {
return Row(
children: <Widget>[
Container(
height: 100,
width: 50,
color: Colors.yellow,
),
Expanded(
flex: 1,
child: Container(
height: 100,
color: Colors.black,
),
),
Expanded(
flex: 2,
child: Container(
height: 100,
color: Colors.red,
),
)
]
)
}
}Padding
A widget that insets its child by the given padding.
When passing layout constraints to its child, padding shrinks the constraints by the given padding, causing the child to layout a smaller size. Padding then sizes itself to its child’s size, inflated by the padding, effectively creating empty space around the child.
- 자식요소에 padding값을
- layout constraints가 전달될 때 이 padding값이 우선적으로 계산되고 남는 공간을 자식요소가 차지
How to use Padding
class MyCard extends StatelessWidget {
const MyCard({super.key});
Widget build(BuildContext context) {
return const Card(
child: Padding(
padding: EdgeInsets.all(16.0),
child: Text("Hello World!"),
),
);
}
}Stack
A widget that positions its children relative to the edges of its box.
This class is useful if you want to overlap several children in a simple way, for example having some text and an image, overlaid with a gradient and a button attached to the bottom.
- stack의 모서리를 기준으로 자식요소들이 순차적으로 배치
- 겹쳐지는 요소들을 표현할 때 유용. 창의적인 배치 가능
How to use Stack
class MyStack extends StatelessWidget {
const MyStack({super.key});
Widget build(BuildContext context) {
return const Stack(
children: <Widget>[
Container(
width: 100,
height: 100,
color: Colors.black,
),
Container(
width: 80,
height: 80,
color: Colors.red,
),
Container(
width: 60,
height: 60,
color: Colors.yellow,
),
],
);
}
}What layouts should we use?
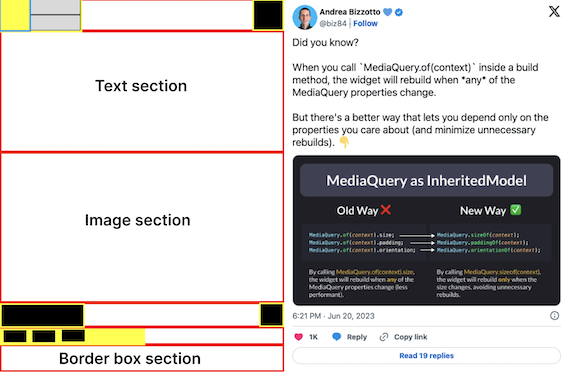
저는 다음과 같이 layout을 구성해보았습니다.
1. 프로필 => Row
상세 구성:
프로필 => Row
프로필 이미지 => Container
Column
이름 및 아이콘 => Row
이메일 및 텍스트 => Row
X 아이콘
2. 본문 - Column
상세 구성:
텍스트 부분
이미지 부분
3. 날짜 - Row
4. 버튼 - Row
5. 댓글 부분 - Container
하나씩 살펴보도록 하겠습니다.
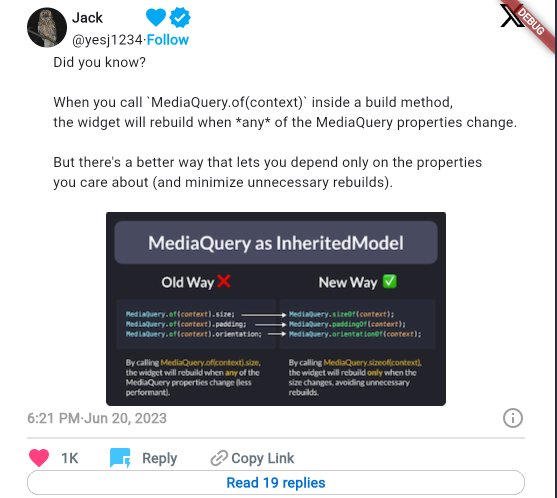
TL;DR
우선 결과물은 이렇습니다.
main.dart
void main() {
var header = const Header();
runApp(header);
}
class Header extends StatelessWidget {
const Header({super.key});
Widget build(BuildContext context) {
return MaterialApp(
title: "Twitter UI clone",
home: Scaffold(
body: Container(
color: Colors.white,
child: const Padding(
padding: EdgeInsets.fromLTRB(30, 5, 30, 5),
child: SingleChildScrollView(
child: Column(
children: [
ProfileHeader(), // 프로필
BodySection(), // 본문
DateSection(), // 날짜
Divider( // 가로 구분선
thickness: 1,
),
ButtonSection(), // 버튼
CommentSection(), // 댓글
],
)),
),
),
),
);
}
}
ProfileHeader
import 'package:flutter/material.dart';
class ProfileHeader extends StatelessWidget {
const ProfileHeader({super.key});
Widget build(BuildContext context) {
return const Row(
mainAxisAlignment: MainAxisAlignment.spaceBetween,
children: [
Row(
children: [
ProfileImage(),
Padding(
padding: EdgeInsets.only(left: 5),
child: Column(
mainAxisAlignment: MainAxisAlignment.center,
crossAxisAlignment: CrossAxisAlignment.start,
children: [
SizedBox(
width: 120,
child: ProfileName(),
),
ProfileSub(),
],
),
),
],
),
SizedBox(
height: 49,
child: Align(
alignment: Alignment.topLeft,
child: Image(
image: AssetImage("/images/xlogo.png"),
width: 25,
height: 25,
),
),
),
],
);
}
}
class ProfileImage extends StatelessWidget {
const ProfileImage({super.key});
Widget build(BuildContext context) {
return const CircleAvatar(
backgroundImage: AssetImage("/images/owl.jpeg"),
);
}
}
class ProfileName extends StatelessWidget {
const ProfileName({super.key});
Widget build(BuildContext context) {
return const Row(
mainAxisAlignment: MainAxisAlignment.spaceBetween,
children: [
Expanded(
flex: 1,
child: Text(
"Jack",
style: TextStyle(fontWeight: FontWeight.bold),
),
),
Icon(Icons.favorite, color: Colors.lightBlue),
Icon(Icons.verified_sharp, color: Colors.lightBlue),
],
);
}
}
class ProfileSub extends StatelessWidget {
const ProfileSub({super.key});
Widget build(BuildContext context) {
return const Row(
mainAxisAlignment: MainAxisAlignment.start,
children: [
Text("@yesj1234", style: TextStyle(fontWeight: FontWeight.w100)),
Text("·"),
Text("Follow",
style: TextStyle(
fontWeight: FontWeight.bold, color: Colors.lightBlue)),
],
);
}
}
PostSection
import 'package:flutter/material.dart';
class BodySection extends StatelessWidget {
const BodySection({super.key});
Widget build(BuildContext context) {
return Container(
color: Colors.white,
child: const Column(
children: <Widget>[
Text("""
Did you know?
When you call `MediaQuery.of(context)` inside a build method,
the widget will rebuild when *any* of the MediaQuery properties change.
But there's a better way that lets you depend only on the properties
you care about (and minimize unnecessary rebuilds).
"""),
Image(
image: AssetImage("/images/eximage.png"),
),
],
),
);
}
}
DateSection
import 'package:flutter/material.dart';
class DateSection extends StatelessWidget {
const DateSection({super.key});
Widget build(BuildContext context) {
return const Row(
mainAxisAlignment: MainAxisAlignment.spaceBetween,
children: <Widget>[
Row(children: <Widget>[
Text(
"6:21 PM",
style: TextStyle(
fontWeight: FontWeight.bold,
color: Colors.grey,
),
),
Text(
"·",
style: TextStyle(
fontWeight: FontWeight.bold,
color: Colors.grey,
),
),
Text(
"Jun 20, 2023",
style: TextStyle(
fontWeight: FontWeight.bold,
color: Colors.grey,
),
)
]),
Icon(
Icons.info_outlined,
color: Colors.grey,
),
],
);
}
}
ButtonSection
import 'package:flutter/material.dart';
class ButtonSection extends StatelessWidget {
const ButtonSection({super.key});
Widget build(BuildContext context) {
return Row(
children: [
const Padding(
padding: EdgeInsets.only(right: 30),
child: IconWithText(
icon: Icon(
Icons.favorite,
color: Colors.pinkAccent,
),
text: "1K"),
),
const Padding(
padding: EdgeInsets.only(right: 30),
child: IconWithText(
icon: Icon(
Icons.quickreply,
color: Colors.lightBlueAccent,
),
text: "Reply"),
),
Padding(
padding: const EdgeInsets.only(right: 0),
child: Row(
children: [
Transform.rotate(
angle: -3.14 / 4.5,
child: const Icon(
Icons.link,
color: Colors.grey,
),
),
const Text(
"Copy Link",
style: TextStyle(
color: Color.fromRGBO(83, 100, 113, 0.9),
fontWeight: FontWeight.w800,
),
),
],
),
),
],
);
}
}
class IconWithText extends StatelessWidget {
final Icon icon;
final String text;
const IconWithText({super.key, required this.icon, required this.text});
Widget build(BuildContext context) {
return Row(
children: [
icon,
Padding(
padding: const EdgeInsets.only(left: 10),
child: Text(
text,
style: const TextStyle(
color: Color.fromRGBO(83, 100, 113, 0.9),
fontWeight: FontWeight.w800,
),
)),
],
);
}
}
CommentSection
import 'package:flutter/material.dart';
class CommentSection extends StatelessWidget {
const CommentSection({super.key});
Widget build(BuildContext context) {
return Container(
alignment: Alignment.center,
height: 25,
width: double.maxFinite,
decoration: BoxDecoration(
border: Border.all(width: 0.2),
borderRadius: const BorderRadius.horizontal(
left: Radius.elliptical(100, 100),
right: Radius.elliptical(100, 100),
),
),
child: const Text(
"Read 19 replies",
style: TextStyle(
color: Color.fromRGBO(0, 112, 214, 1),
fontWeight: FontWeight.w900,
),
),
);
}
}
Andrea’s Code
Andrea의 코드는 제 코드와 몇 가지 차이점이 있었습니다.
1. Padding이 아닌 SizedBox를 이용해 간격 조정
SizedBox를 이용해 간격을 조정하면 코드 상에서 배치가 좀 더 직관적으로 상상이 됩니다.
2. CircleAvatar가 아닌 ClipOval로 프로필 이미지 표현
3. Widget을 만들 때 데이터를 하드코딩 하는게 아니라 인자로 받아와서 넣는 방식으로 사용
Widget의 재사용성을 높이기 위해서는 인자로 받아와서 넣는 방식이 효율적일 것 같습니다.
위의 내용을 참고하여 다음 문제도 이어서 풀어보도록 하겠습니다.