글을 일기전에 문제를 먼저 고민해보고 andrea의 예시 답안을 보고나서 읽기를 추천드립니다!
pro.codewithandrea.com 의 flutter ui challenge 3번째 문제입니다.(링크)
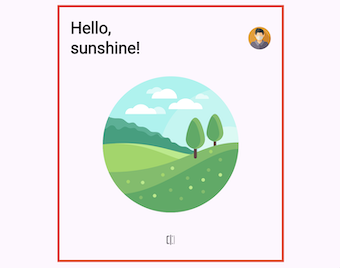
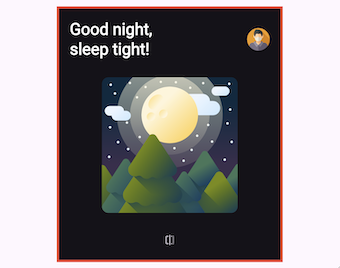
구현하고자 하는 것은 앞뒤에 서로 다른 그림이 있는 페이지를 만들고 버튼과 drag gesture을 통해 앞과 뒤가 바뀌는 애니메이션을 넣는 것입니다.
구현 목표는 다음과 같습니다.
- PageFlipBuilder stateful widget 만들기
- AnimationController 과 AnimatedWidget 을 이용해 뒤집는 애니메이션을 구현하고 버튼을 눌렀을 때 작동되도록 onFlip 콜백에 등록
- Transform widget을 이용해 페이지가 회전하는 듯한 효과 주기
- transform 시 tilt 값을 이용해 3D처럼 보이도록하기
- GestureDetector를 이용해 drag 제스처 감지 및 로직 구현하기
- AnimationController의 상한값을 1로 하한값을 -1로 설정하기
- “fling” 을 이용해 좀 더 물리적으로 좀 더 실감나는 애니메이션 구현
- 위젯의 구성을 설계할 때 변화와 edge case에 대응 할 수 있는 코드로 설계할 것.
Widget 구성
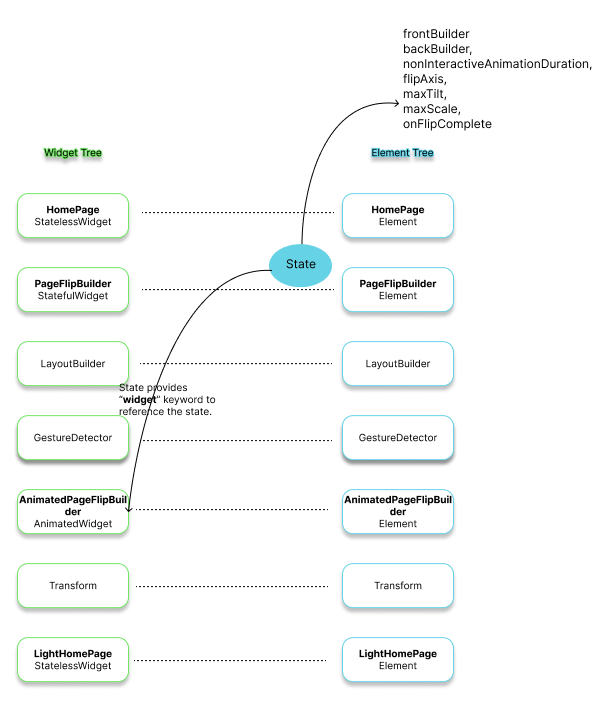
HomePage
GlobalKey
Global keys uniquely identify elements. Global keys provide access to other objects that are associated with those elements, such as BuildContext. For StatefulWidgets, global keys also provide access to State.
onFlip의 구현이 StatelessWidget인 LightHomePage 혹은 DarkHomePage에 없음.
만약 LightHomePage 혹은 DarkHomePage 안에서 onFlip을 구현하려고 한다면 다음과 같은 문제가 생김
- 코드가 중복
- animation controller를 사용하기 위해서 구조자체를 바꿔야함
- 요구사항 변경에 대응하기 어려움
확장성있고 재활용 가능한 위젯으로 활용하기 위해서는 위처럼 Key를 이용해 State 안에서 onFlip을 정의해서 사용하는 것이 좋음.
PageFlipBuilder
Required properties
frontBuilder & backBuilder :
frontBuilder 와 backBuilder를 이용해 보여주고자하는 페이지를 유동적으로 변경할 수 있음.
코드에서 사용되는 builder는 정확히는 Builder 위젯을 의미하는게 아니라 WidgetBuilder typedef를 사용함.
WidgetBuilder = Widget Function(BuildContext context)Signature for a function that creates a widget, e.g. StatelessWidget.build or State.build
Default value properties
nonInteractiveAnimationDuration
defaults to const Duration(milliseconds: 500)
animation이 진행되는 시간. controller.begin ~ controller.end 까지의 애니메이션이 500ms동안 진행됨.
interactiveFlipEnabled
defaults to true
interactiveFlipEnabled가 true일 경우에만 drag gesture를 이용한 화면 전환 허용
flipAxis
defaults to Axis.vertical
화면 전환 시 사용되는 회전축.
현재 기본값은 Axis.vertical로 화면상 y축이 회전축이 되어 화면을 전환
maxTilt
defaults to 0.003
Transform 위젯 사용시 tilt효과에 적용될 값. tilt는 직역하자면 기울인다는 뜻인데 시점을 보정해주는 역할을 합니다.
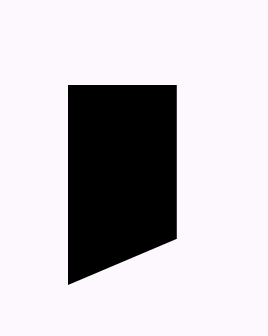
예를 들어 100 x 100 사이즈의 박스를 y축을 기준으로 45도 기울일 경우 생각과는 일반적으로 예상하는 결과와는 다른 상황이 벌어집니다.
Transform(
	transform: Matrix4.rotationY(pi /4),
	child: Container(
		width: 100,
		height: 100,
		decoration: const BoxDecoration(
			color: Colors.black
		)
	)
)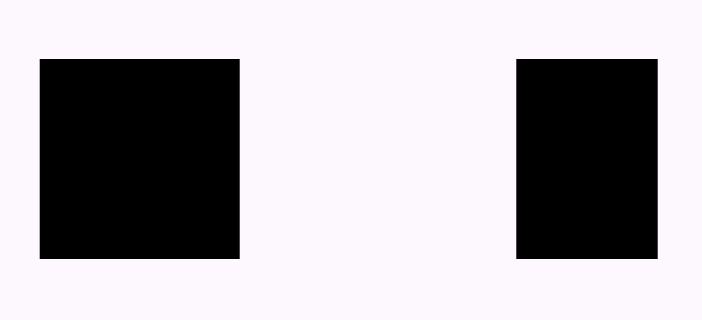
하지만 tilt값을 설정해준다면 다음과 같이 기울기가 적용되어 실제 3D상에서 45도를 기울인것 같은 결과를 볼수 있습니다.
Transform(
	transform: Matrix4.rotationY(pi /4)..setEntry(3, 0, 0.003),
	child: Container(
		width: 100,
		height: 100,
		decoration: const BoxDecoration(
			color: Colors.black
		)
	)
)
tilt값을 설정해준다고 하면서 실제로 한 것은 Matrix4의 3행, 0열에 0.003을 넣어준것입니다.
이게 어떻게 tilt값을 설정해준다는 것일까요?
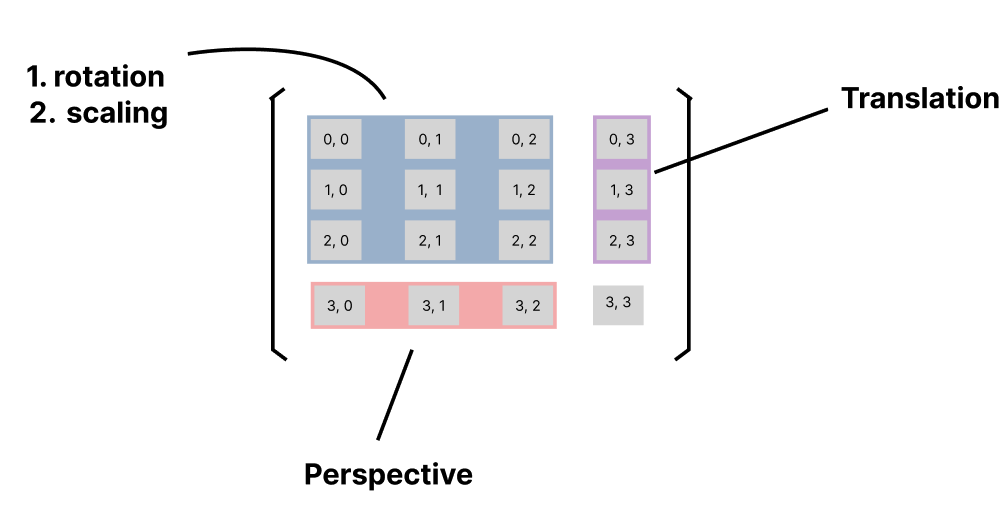
우선 Flutter가 어떤식으로 화면의 한 점을 나타내는지 알아야 합니다.
Flutter는 기본적으로 모든 화면을 3d공간상의 좌표로 표현하는데, 좌표의 한 점을 표현할 때 x값, y값, z값 에 추가로 한 가지 값을 더 넣어서 4개의 값으로 한 점을 표현합니다.
이런식으로 좌표를 표현하는 것을 동차좌표(homogeneous coordinates)라고 합니다.
예를 들어 한 점(a, b, c)은 (aw, bw, cw, w)로 표현합니다. w값이 1이라면 (a, b, c, 1) 이 되는 식입니다.
따라서, Flutter가 그려내는 화면의 어떤 한 점은 1 x 4 모양의 행렬이됩니다. (사실은 4 x 1 행렬입니다.)
Matrix4는 보이는 화면의 특정한 한 점을 나타내는 것이 아니라 어떤 요소에 적용할 변환(transform) 행렬(matrix)입니다.
예를 들어, Matrix4.rotationY(pi/4) 는 pi /4 radian (45도) 만큼 y축을 기준으로 회전시키는 변환을 나타내는 4x4 행렬입니다.
다음은 이 Matrix4의 각 부분이 어떤 변환을 나타내는지 알 수 있는 간단한 그림입니다.
maxScale
0.2
스케일 즉, 확대 또는 축소하는 효과를 줄 수 있습니다.
값이 1보다 크면 확대, 작으면 축소한다고 생각할 수 있습니다.
class AnimatedPageFlipBuilder extends AnimatedWidget {
	...
	return Transform(
		transform: matrix * Matrix4.diagonal3Values(scale, scale, 1.0),
	);
}
onFlipComplete
optional
onFlipComplete는 필수값은 아닙니다. 현재는 디버깅을 위해 showFrontSide 상태를 로그에 찍어주는 콜백을 사용했습니다.
PageFlipBuilderState
showFrontSide
wasFrontSide
AnimatedPageFlipBuilder
Required properties
showFrontSide
frontBuilder & backBuilder
Default value properties
flipAxis
maxTilt
maxScale
내부 메서드 세부 구현
PageFlipBuilderState
flip
void flip() {
	_wasFrontSide = _showFrontSide;
	if (_showFrontSide) {
		_controller.forward();
	} else {
		_controller.reverse();
	}
}
flip은 wasFrontSide와 showFrontSide를 property를 이용해 현재 보여지는 페이지의 상태를 바꿔주는 콜백함수입니다.
로직자체는 어렵지 않지만 왜 이렇게 썼는지 바로 이해하기엔 헷갈릴 수 있습니다.
showFrontSide 가 true라면 controller.forward 즉, 페이지를 뒤집는 애니메이션이 실행됩니다.
애니메이션은 다음의 4가지 상태값을 갖습니다.
- dismissed : animation이 시작 지점에서 멈췄을 때
- forward : animation이 시작지점에서 끝지점으로 진행중 일 때
- reverse : animation이 끝지점에서 시작지점으로 진행중 일 때
- completed : animation이 끝지점에서 멈췄을 때
...
late final AnimationController _controller;
...
void initState() {
_controller = AnimationController(
vsync: this,
duration: widget.nonInteractiveAnimationDuration,
lowerBound: -1.0,
upperBound: 1.0,
);
_controller.value = 0.0;
_controller.addStatusListener(_updateStatus);
super.initState();
}현재 PageFlipBuilderState의 animation controller는 다음과 같은 status listener를 갖고 있습니다.
...
	void _updateStatus(AnimationStatus status) {
	if (status == AnimationStatus.completed ||
		status == AnimationStatus.dismissed) {
		_controller.value = 0.0;
		setState(() => _showFrontSide = !_showFrontSide);
		if (_wasFrontSide != _showFrontSide) {
			_wasFrontSide = _showFrontSide;
			widget.onFlipComplete?.call(_showFrontSide);
			}
		}
	}
현재의 애니메이션의 상태가 completed(forward 완료) 혹은 dismissed(reverse 완료)가 됐을 때, 즉 완전한 페이지 전환이 한차례 이루어졌을 때 showFrontSide값을 반대로 바꾸어주고 있습니다.
만약 GestureDetector가 없이 버튼으로만 페이지를 전환했다면 showFrontSide값을 바꾸는 로직이 flip에 있어도 되지만, 지금처럼 버튼 이외의 요소가 상태(showFrontSide)를 변경할 수 있는 환경에서는 해당 상태가 결정되는 지점에서 로직을 구현해야합니다.
그런데 애초에 wasFrontSide와 showFrontSide 변수는 왜 필요할까요?
flip상태를 보기 위해서라면 showFrontSide 하나만 있어도 충분할 것 같습니다.
wasFrontSide는 updateStatus 함수의 마지막 줄때문에 필요합니다.
widget.onFlipComplete?.call(\_showFrontside);
class PageFlipBuilder extends StatefulWidget {
	...
	final void Function(bool)? onFlipComplete;
}
PageFlipBuilder는 flip이 완료됐을 때 최종적으로 실행시킬 함수를 가질 수 있습니다.
함수의 이름처럼 flip이 완료됐을 때를 판단하기 위해서는 현재 보여지는 페이지가 이전 페이지와는 다른 페이지라는 정보를 알아야 하기 때문에 wasFrontSide가 필요하게 된 것입니다.
GestureDetector callbacks
GestureDetector는 이름처럼 스크린에 감지되는 행동에 반응할 수 있는 widget입니다.
다양한 제스처들이 있지만 지금 하고자 하는 것은 수평(horizontal)으로 혹은 수직(vertical)으로 잡아끄는(drag) 모션을 감지하고 그에 맞게 페이지를 뒤집는듯한 애니메이션을 넣고 싶습니다.
이를 위해선 GestureDetector에 다음과 같은 콜백을 등록해주어야합니다.
GestureDragStartCallback? onHorizontalDragStart
GestureDragUpdateCallback? onHorizontalDragUpdate
GestureDragEndCallback? onHorizontalDragEnd
GestureDragStartCallback? onVerticalDragStart
GestureDragUpdateCallback? onVerticalDragUpdate
GestureDragEndCallback? onVerticalEnd
이 콜백함수들은 해당 제스처에 맞는 로직을 구현하기 위한 상세값(detail)을 파라미터로 갖습니다.
예를 들어 GestureDragUpdateCallback은 DragUpdateDetails 를 파라미터로 갖습니다.
GestureDragUpdateCallback = void Function(DragUpdateDetails details)
이 detail이 제공하는 값들을 가지고 적절하게 애니메이션을 컨트롤하는 로직을 구현하면 되는데 다음의 3가지 함수가 그 역할을 하고 있습니다.
handleDragStart
void _handleDragStart(DragStartDetails details) {
	_wasFrontSide = _showFrontSide;
}
DragGesture가 시작될 때 wasFrontSide의 값을 showFrontSide로 업데이트해줍니다.
handleDragUpdate
void _handleDragUpdate(DragUpdateDetails details, double crossAxisLength) {
  _controller.value += details.primaryDelta! / crossAxisLength;
  debugPrint((details.primaryDelta! / crossAxisLength).toString());
}
controller 시작 지점 값과 끝 지점의 값을 갖는 애니메이션입니다.
시작 지점은 0이고 끝지점은 처음 controller를 만들때 1(upperBound) 또는 -1(lowerBound)로 설정해주었습니다.
primaryDelta는 이전 업데이트로부터 마우스(또는 손가락)가 메인 축을 따라(horizontal drag일 경우 x축) 얼마만큼 움직였는지를 알려줍니다.
primaryDelta 값을 crossAxisLength로 나누어주고 있는데 crossAxisLength는 horizontal drag일 경우 x축의 max width, vertical drag일 경우 y축의 max height이 됩니다. 현재 코드상 crossAxisLength는 다음과 같이 구해집니다.
final crossAxisLength = isHorizontal ? constraints.maxWidth : constraints.maxHeight;(변수명을 좀 헷갈리게 만든것 같긴 하네요..^^; )
primaryDelta값을 crossAxisLength값으로 나눠주는 이유는 정규화를 해주기 위해서입니다.
값을 0~1사이로 보정해 다른 사이즈의 스크린에서도 동일한 애니메이션 효과를 얻을 수 있습니다.
controller.value에 값을 누적해서 더하고 있는데 upperBound, lowerBound가 설정되어 있기 때문에 범위를 넘어설 걱정은 안해도 됩니다.
handleDragEnd
void _handleDragEnd(DragEndDetails details, double crossAxisLength) {
  if (_controller.isAnimating ||
      _controller.status == AnimationStatus.completed ||
      _controller.status == AnimationStatus.dismissed) return;

  const velocityThreshold = 2.0;
  final velocity = widget.flipAxis == Axis.horizontal
      ? details.velocity.pixelsPerSecond.dx
      : details.velocity.pixelsPerSecond.dy;
  final flingVelocity = velocity / crossAxisLength;

  // if value and velocity are 0, the gesture was a tap so we return early
  if (_controller.value == 0.0 && flingVelocity == 0.0) {
    return;
  }
  if (_controller.value > 0.5 ||
      _controller.value > 0.0 && flingVelocity > velocityThreshold) {
    _controller.fling(velocity: velocityThreshold);
  } else if (_controller.value < -0.5 ||
      _controller.value < 0.0 && flingVelocity < -velocityThreshold) {
    _controller.fling(velocity: -velocityThreshold);
  } else if (_controller.value > 0.0 ||
      _controller.value > 0.5 && flingVelocity < -velocityThreshold) {
    // controller can't fling to 0.0 because the lowerBound is -1.0
    // so we decrement the value by 1.0 and toggle the state to get the same effect    _controller.value -= 1.0;
    setState(() => _showFrontSide = !_showFrontSide);
    _controller.fling(velocity: -velocityThreshold);
  } else if (_controller.value > -0.5 ||
      _controller.value < -0.5 && flingVelocity > velocityThreshold) {
    // controller can't fling to 0.0 because the upperBound is 1.0
    // so we increment the value by 1.0 and toggle the state to get the same effect    _controller.value += 1.0;
    setState(() => _showFrontSide = !_showFrontSide);
    _controller.fling(velocity: velocityThreshold);
  }
}
사용자가 drag gesture를 종료하는 시점에 호출될 callback입니다.
여러가지 상황에 대해 케이스를 분류하여 실행될 로직을 구현해놨습니다.
드래그를 하다가 어떤 시점에 마우스(또는 손가락)를 화면에서 떼면 페이지를 다시 원점으로(드래그 하기 직전으로) 되돌리는 애니메이션(fling)을 실행시키도록 합니다.
fling은 velocity값을 파라미터로 받습니다.
velocity가 양수일 경우 animation forward, 음수일 경우 animation reverse 한다고 생각할 수 있습니다.
velocityThreshold는 얼마나 빠르게 드래그 했냐를 판단하는 기준값입니다.
현재는 pixelsPerSecond / crossAxisLength 값을 이용해 2(velocityThreshold)보다 큰지 작은지를 보아 빠르냐 느리냐를 판단하고 있습니다.
가능한 상황은 다음과 같습니다.
- fling 애니메이션이 실행될 필요가 없는 경우.
- fling 애니메이션이 필요한 경우
- 화면을 180도 넘게 돌렸거나 혹은 매우 빠르게 우측으로 drag한 경우
- 화면을 -180도 넘게 돌렸거나 혹은 매우 빠르게 좌측으로 drag한 경우
- 화면을 0~180도 돌렸거나 혹은 180도 넘게 돌렸으나 다시 좌측으로 매우 빠르게 drag한 경우
- 화면을 -180 ~ 0도 돌렸거나 혹은 -180도 넘게 돌렸으나 다시 우측으로 매우 빠르게 drag한 경우
AnimatedPageFlipBuilder
controller의 animation이 진행됨에 따라 어떻게 Transform을 적용할지를 정해주는 부분입니다.
getTilt
double _getTilt() {
  var tilt = (animation.value - 0.5).abs() - 0.5;
  if (animation.value < -0.5) {
    tilt = 1.0 + animation.value;
  }
  return tilt * (_isAnimationFirstHalf ? -maxTilt : maxTilt);
}
rotationAngle
double _rotationAngle() {
  final rotationValue = animation.value * pi;
  if (animation.value > 0.5) {
    return pi - rotationValue; // input from 0.5 to 1.0
  } else if (animation.value > -0.5) {
    return rotationValue; // input from -0.5 to 0.5
  } else {
    return -pi - rotationValue; // input from -1.0 to -0.5
  }
}
scale
double _scale() {
  final absValue = animation.value.abs();
  return 1.0 - (absValue < 0.5 ? absValue : 1.0 - absValue) * maxScale;
}
보이는 것과는 달리 생각보다 어려운 문제였습니다.
단순하게 한번 실행되고 종료되는 애니메이션이 아니기 때문에 ticker 하나만으로는 구현이 어렵습니다.
유저의 입력이 어떤 식으로 들어올지 각 케이스를 자세하게 분류해야 하며,
실감나는 3D 애니메이션을 만들기 위해 적절한 변환을 적용해주어야 합니다.
구현 과정에서는 변동 가능성을 염두에 두고 위젯의 유연한 설계를 위한 고민도 필요했습니다.
andrea의 예시 답안을 나름대로 분석해보며 많이 배우는 시간이었습니다.
Example
animation controller 정의
class DayViewCard extends ConsumerStatefulWidget {
const DayViewCard({super.key, required this.journal});
final Journal journal;
ConsumerState<_DayViewCard> createState() => _DayViewCardState();
}
class _DayViewCardState extends ConsumerState<DayViewCard> with SingleTickerProviderMixin {
// define animation controller to handle the user drag gesture.
late final AnimationController<double> _controller;
void initState() {
super.initState();
_controller = AnimationController(
vsync: this,
duration: const Duration(milliseconds: 300),
lowerBound: -400,
upperBound: 0, // Prevent dragging to right.
);
_controller.value = 0.0;
}
void dispose() {
_controller.dispose(); // Make sure to dispose the controller.
super.dispose();
}
}GestureDetector의 horizontal drag callback 정의
class _DayViewCardState extends ConsumerState<DayViewCard> with SingleTickerProviderMixin {
  ...

  void handleDragUpdate(DragUpdateDetails details) {
    // Update the animation controllers value continuously on user's gesture.
    _controller.value += details.primaryDelta!;

    // If the user has dragged the journal over deleteOnDragThreshold,
    // vibrate the phone to indicate that this drag action will fire the delete callback.
    if (_controller.value.abs() > deleteOnDragThreshold && !didVibrate) {
      HapticFeedback.heavyImpact();
      didVibrate = true;
    }

    // if the user has dragged the journal over deleteOnDragThreshold,
    // and thus the phone has vibrated, and did not end the drag gesture
    // but dragged back to the point where the controller's value to under deleteOnDragThreshold,
    // reset the didVibrate boolean, so that dragging the journal over the threshold
    // will again make the phone vibrate.
    if (_controller.value.abs() < deleteOnDragThreshold && didVibrate) {
      didVibrate = false;
    }

  }

  void handleDragEnd(DragEndDetails details) {

    // If previous animation is still on progress, block further animation updates.
    if (_controller.isAnimating || _controller.status == AnimationStatus.completed) {
      return;
    }

    // If the phone has vibrated, indicating that the user wants to delete the journal,
    // execute the on delete callback and reset the journal to the original point,
    // where Offset is 0 from right.
    if (didVibrate) {
      _handleOnDelete(context);
      _controller.forward();
      return;
    }

    // Reset the didVibrate bool to false.
    didVibrate = false;


    // Threshold of which to decide user's intention whether to open the icon menus or not.
    const velocityThreshold = 2.0;

    // If user has dragged the journal fast enough to overcome the velocityThreshold,
    // which is 2 logical pixcels per second, then reset the position of the journal.
    // This gets called only when dragging to right.
    if (details.primaryVelocity! >= velocityThreshold) {
      _controller.fling();
      return;
    }

    // If user has not dragged the journal good enough to show the delete icon button,
    // than reset the journal's position.
    if (_controller.value.abs() < deleteIconStartFrom) {
      _controller.forward();
      return;
    }


    if (_controller.value.abs() >= deleteIconStartFrom || details.primaryVelocity! >= velocityThreshold) {
      _controller.animateTo(
        -dragEndsAt,
        curve: Curves.easeOutCirc,
        duration: const Duration(milliseconds: 500),
      );
      return ;
    }

    if (details.primaryVelocity! > velocityThreshold) {
      _controller.animateTo(-dragEndsAt);
      return;
    }
    return;
  }
}
variables used for handling the animation.
class _DayViewCardState extends ConsumerState<DayViewCard> with SingleTickerProviderMixin {
  /// Whether the user dragged the journal over [deleteOnDragThreshold] offset value.
  bool didVibrate = false;

  /// Distance of which the icon
  double opacityDistance = 25;

  double get iconSize => 45;

  /// delete icon will start appearing from this offset to the right
  /// Since 8 is the default padding applied to the IconButton, adjust the logical
  /// pixels based on this value.
  double get deleteIconStartFrom => iconSize - 24;

  /// delete icon will start appearing from this offset to the right
  /// Since 8 is the default padding applied to the IconButton, adjust the logical
  /// pixels based on this value.
  double get editIconStartFrom => iconSize * 2;

  /// Position of which the drag will end up on user drag gesture to open edit and delete icon buttons.
  double get dragEndsAt => editIconStartFrom + opacityDistance + 10;

  /// Threshold of which the drag gesture fires the on delete callback.
  double get deleteOnDragThreshold => 2 * (iconSize + (opacityDistance)) + 40;
}
AnimatedWidget으로 완성하기
class AnimatedDayViewBuilder extends AnimatedWidget {
const AnimatedDayViewBuilder({
super.key,
required this.animation,
required this.journal,
required this.iconSize,
required this.deleteIconOpacity,
required this.editIconOpacity,
required this.deleteIconStartFrom,
required this.editIconStartFrom,
required this.deleteOnDragThreshold,
this.opacityDistance,
this.onEditCallback,
this.onDeleteCallback,
this.onTapCallback,
this.isOverThreshold,
}) : super(listenable: animation);
final Animation<double> animation;
final Journal journal;
final double iconSize;
final double Function(double value) deleteIconOpacity;
final double Function(double value) editIconOpacity;
final double deleteIconStartFrom;
final double editIconStartFrom;
final double deleteOnDragThreshold;
final double? opacityDistance;
final void Function()? onEditCallback;
final void Function(BuildContext)? onDeleteCallback;
final void Function()? onTapCallback;
final bool? isOverThreshold;
Widget build(BuildContext context) {
final Widget deleteIconButton = IconButton(
onPressed: () => onDeleteCallback?.call(context),
iconSize: iconSize,
style: IconButton.styleFrom(
shape: const CircleBorder(),
backgroundColor: Colors.redAccent,
foregroundColor: Theme.of(context).scaffoldBackgroundColor,
),
icon: const Icon(Icons.delete_forever),
);
final Widget deleteIcon = animation.value < -deleteIconStartFrom
? AnimatedPositioned(
top: 0,
bottom: 0,
right: animation.value < -deleteOnDragThreshold
? -(animation.value + 72)
: 0,
duration: const Duration(milliseconds: 100),
curve: Curves.decelerate,
child: Center(
child: AnimatedOpacity(
opacity: deleteIconOpacity(animation.value),
duration: const Duration(milliseconds: 100),
child: deleteIconButton),
),
)
: const SizedBox.shrink();
final editIconButton = IconButton(
onPressed: () {
onEditCallback?.call();
context.push('/update/${journal.id}');
},
style: IconButton.styleFrom(
shape: const CircleBorder(),
backgroundColor: Colors.lightGreen,
foregroundColor: Theme.of(context).scaffoldBackgroundColor,
),
iconSize: iconSize,
icon: const Icon(Icons.edit),
);
final Widget editIcon = animation.value < -editIconStartFrom &&
animation.value > -deleteOnDragThreshold
? Positioned(
top: 0,
bottom: 0,
right: iconSize + 24,
child: Center(
child: AnimatedOpacity(
opacity: editIconOpacity(animation.value),
duration: const Duration(milliseconds: 100),
child: editIconButton,
),
),
)
: const SizedBox.shrink();
return Stack(
children: [
deleteIcon,
editIcon,
Transform.translate(
offset: Offset(animation.value, 0),
child: Padding(
padding: const EdgeInsets.only(top: 4.0),
child: Center(
child: DayViewCard(
verticalPadding: 0,
journal: journal,
onTapCallback: onTapCallback,
),
),
),
),
],
);
}
}예시에 사용된 전체 코드는 여기에서 확인하실 수 있습니다.