State management
State
Flutter를 이용한 앱개발의 관점에서 상태(State)라는 용어는 일반적으로 다음과 같은 것들을 의미합니다.
- 버튼의 클릭 상태나 애니메이션의 진행 상태와 같이 앱의 한 곳에서만 사용되는 Local state
- 로그인 상태나 환경 변수와 같이 앱 전반에 걸쳐 사용되는 Global state
Local state는 app의 다른 곳에서 같은 정보를 사용할 일이 없는 정보이기 때문에 딱히 관리라고 할 것이 필요가 없습니다.
Global state는 반대로 state의 정보를 app의 여러 곳에서 사용합니다. 따라서 state를 일관되게 유지해야 하고 state에 변화가 생길 경우의 side-effect를 어떻게 다룰지 고려해야 합니다.
Flutter는 이러한 Global State를 관리하기위해 InheritedWidget, InheritedModel 등의 기본적인 방법을 제공하지만, Flutter 초보자 입장에서 이것들만을 활용해 상태를 관리하기란 쉽지 않습니다.
그래서 Flutter는 Provider라는 패키지를 사용할 것을 추천하고 있습니다만, Provider를 좀 더 쉽게 사용할 수 있게끔 만든 Riverpod에 대해 알아보고자 합니다. (Provider와 Riverpod 모두 Remi Rousselet가 만들었습니다.)
Riverpod
Riverpod 은 Provider를 기반으로 만든 Flutter 앱을 위한 반응형 캐싱 프레임워크입니다.
Riverpod은 Flutter와 마찬가지로 선언적인(declarative) 프로그래밍 방법으로 앱에 필요한 상당 부분을 대신 해결해줍니다.
예를 들면, 네트워크 요청시에
- Handling error and loading status
- Caching
- Automatic re-fetching when necessary
또한 앱의 규모가 커짐에 따라 필요해지는 기능들, 예를 들어
- Pull to refresh (당겨서 새로고침)
- Infinite lists / fetch as we scroll (무한 스크롤)
- Search as we type (검색)
- Debouncing asynchronous requests (비동기요청 묶음 처리)
- Cancelling asynchronous requests when no-longer used (사용되지 않는 비동기 요청 취소)
- Optimistic UIs (실패할 확률이 낮은 요청에 대한 낙관적인 페이지 처리)
- Offline mode (비행기 모드)
Riverpod은 Provider를 통한 상태관리와 위처럼 그에 관련된 여러 가지 문제 상황들을 해결하고자 나온 패키지라고 볼 수 있겠습니다.
Riverpod의 가장 근본적인 기능인 상태관리와 관련된 핵심적인 부분들에 대해 먼저 알아보겠습니다.
다음과 같은 상황을 가정해 보겠습니다.
야외 활동과 관련된 앱을 만드는데 다음과 같은 요구사항이 생겼습니다.
- 데이터는 외부 서버로부터 받아와서 사용해야 함
- 받아온 데이터는 캐싱되어야 하며
- 네트워크 요청시 Error / loading 상태를 고려하여야함
- 데이터에 변동이 있을 경우 데이터를 업데이트 해야함
받아올 데이터(Activity)는 다음과 같은 정보를 포함해야 합니다.
- key
- activity
- type
- participants
- price
Modeling
JSON 데이터를 Flutter앱에서 안전하게 사용하기 위해서는 Dart class 객체로 변환하여 사용하는 것이 좋습니다. JSON decoding을 할 때는 일반적으로 Freezed나 json_serializable 같은 code generator 패키지를 많이 사용합니다.
import 'package:freezed_annotation/freezed_annotation.dart';
part 'activity.freezed.dart';
part 'activity.g.dart';
/// The response of the `GET /api/activity` endpoint.
///
/// It is defined using `freezed` and `json_serializable`.
class Activity with _$Activity {
factory Activity({
required String key,
required String activity,
required String type,
required int participants,
required double price,
}) = _Activity;
/// Convert a JSON object into an [Activity] instance.
/// This enables type-safe reading of the API response.
factory Activity.fromJson(Map<String, dynamic> json) => _$ActivityFromJson(json);
}freezed에 대한 부분은 따로 정리하도록 하고 여기선 넘어가겠습니다.
이제 JSON 데이터를 안전하게 받아올 Model이 생겼으니 이 데이터를 제공해줄 Provider를 만들어 보도록 하겠습니다.
Provider
import 'dart:convert';
import 'package:flutter_riverpod/flutter_riverpod.dart';
import 'package:http/http.dart' as http;
import 'package:riverpod_annotation/riverpod_annotation.dart';
import 'activity.dart';
// Necessary for code-generation to work
part 'provider.g.dart';
/// This will create a provider named `activityProvider`
/// which will cache the result of this function.
Future<Activity> activity(Ref ref) async {
// Using package:http, we fetch a random activity from the Bored API.
final response = await http.get(Uri.https('boredapi.com', '/api/activity'));
// Using dart:convert, we then decode the JSON payload into a Map data structure.
final json = jsonDecode(response.body) as Map<String, dynamic>;
// Finally, we convert the Map into an Activity instance.
return Activity.fromJson(json);
}@riverpod (OR @Riverpod)
Provider를 만들 때는 반드시 @riverpod 혹은 @Riverpod() annotation을 포함해야 합니다.
@Riverpod() annotation을 사용하여 provider 관련 옵션(auto-dispose등의)을 설정할 수 있습니다.
Future activity(Ref ref) async
함수의 이름이 activity이기 때문에 activityProvider 변수가 자동으로 생성됩니다(code-generation이 설정되어 있다면).
함수는 반드시 첫 번째 파라미터로 “ref”를 사용해야합니다.
generic을 포함한 다른 parameter들, optional parameter, named parameter등 자유롭게 설정 할 수 있으며 return type 또한 자유롭게 설정할 수 있습니다.
이 Provider는 처음 사용되는 시점에 실행되며 이후에는 캐시된 값을 리턴합니다.
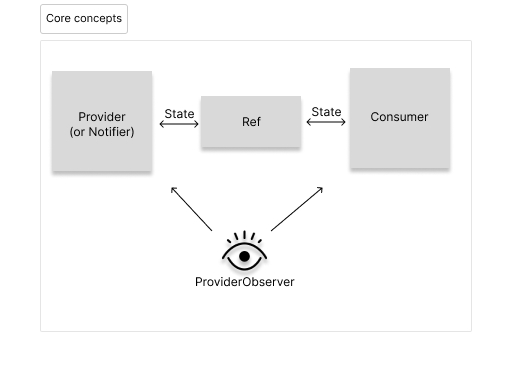
Ref
다른 Provider들을 사용하기 위한 object입니다.
모든 Provider들이 ref object를 갖고 있습니다. 위처럼 함수형으로 선언된 Provider는 파라미터로, class로 선언된 Provider는 property로 갖습니다.
코드는 굉장히 간단하지만 염두에 두어야 할 숨겨진 사항이 몇 가지 있습니다.
- UI에서 provider를 최소한 한번 사용할 때까진 실제 네트워크 요청이 이뤄지지 않습니다.
- 이후 다른 UI에서 provider를 호출할 경우, provider는 새로운 네트워크 요청의 결과값을 반환하는 것이 아니라 캐시된 데이터를 반환합니다.
- 코드의 어떤 부분에서도 Error handling에 관련된 부분이 없지만 Riverpod이 자동으로 처리해줍니다.
Consumer
이제 일관된 정보를 전달해줄 Provider를 정의했으니 가져다 쓸 수 있습니다.
Provider를 사용하기 위해서는 Ref object가 필요하다고 했습니다. Provider를 정의할 때는 ref를 parameter 혹은 class property로 가지고 있었지만 실제 Provider를 쓰는 Widget의 입장에서는 어떻게 ref를 받아와야 할까요?
Consumer 를 사용하면 됩니다.
Consumer 는 Builder에 ref를 추가한 위젯이라고 생각할 수 있습니다.
import 'package:flutter/material.dart';
import 'package:flutter_riverpod/flutter_riverpod.dart';
import 'activity.dart';
import 'provider.dart';
/// The homepage of our application
class Home extends StatelessWidget {
const Home({super.key});
Widget build(BuildContext context) {
return Consumer(
builder: (context, ref, child) {
final AsyncValue<Activity> activity = ref.watch(activityProvider);
return Center(
child: switch (activity) {
AsyncData(:final value) => Text('Activity: ${value.activity}'),
AsyncError() => const Text('Oops, something unexpected happened'),
_ => const CircularProgressIndicator(),
},
);
},
);
}
}final AsyncValue activity = ref.watch(activityProvider);
Consumer가 제공해주는 ref의 watch 메서드를 통해 activityProvider가 제공하는 State의 정보를 읽어옵니다. ref.watch 메서드는 정보를 읽어오는데 그치지 않고 추가적으로 다음과 같은 경우에 widget을 업데이트합니다.
- loading -> data or error
- request 새로고침
- activityProvider가 제공하는 state의 값이 바뀌었을 때 (by side-effect)
switch (activity)
네트워크 요청의 로딩상태 / 성공 / 실패 의 경우에 맞게 알맞은 UI를 그릴 수 있도록 경우를 나눈 것입니다.
Notifier
외부 서버의 API를 이용해 데이터를 읽어오는 것은 어떻게 하는지 알았습니다.
하지만 데이터를 읽어오기만 해서는 의미가 없습니다. 데이터를 추가하거나 변경하거나 삭제할 수도 있어야하죠. 이를 수행하기 위해서는 Notifier가 필요합니다.
Notifier를 좀 더 쉽게 이해하기 위해 todo list를 만든다고 가정해봅시다.
마찬가지로 Provider를 먼저 정의하도록 하겠습니다.
다음과 같이 Provider를 정의할 경우 Consumer에서 Provider의 state를 변경할 수 있는 방법이 없습니다.
// Provider for reading only. No explicit method to modify the data
Future<List<Todo>> todoList(Ref ref) async {
// Simulate a network request. This would normally come from a real API
return [
Todo(description: 'Learn Flutter', completed: true),
Todo(description: 'Learn Riverpod'),
];
}
Consumer가 Provider의 state를 변경할 수 있도록 만들기 위해서는 다음과 같이 class 형태로 Provider를 정의해주고 명시적으로 변경할 수 있는 수단을 method의 형태로 제공해주어야 합니다.
// Notifier that could have explicit method to modify the data
class TodoList extends _$TodoList {
Future<List<Todo>> build() async {
// The logic we previously had in our FutureProvider is now in the build method.
return [
Todo(description: 'Learn Flutter', completed: true),
Todo(description: 'Learn Riverpod'),
];
}
Future<void> addTodo(Todo todo) async {
await http.post(
Uri.https('your_api.com', '/todos'),
headers: {'Content-Type': 'application/json'},
body: jsonEncode(todo.toJson()),
);
}
}이 method는 Consumer의 onPressed와 같은 이벤트 콜백에서 사용할 수 있습니다.
class Example extends ConsumerWidget {
const Example({super.key});
Widget build(BuildContext context, WidgetRef ref) {
return ElevatedButton(
onPressed: () {
// Using "ref.read" combined with "myProvider.notifier", we can
// obtain the class instance of our notifier. This enables us
// to call the "addTodo" method.
ref
.read(todoListProvider.notifier)
.addTodo(Todo(description: 'This is a new todo'));
},
child: const Text('Add todo'),
);
}
}Provider의 state를 변경하긴 했지만 cache된 데이터까지 바꾸지는 못했습니다.
cache된 데이터를 변경해야 해당 state를 사용하고 있는 UI들이 알맞게 바뀔 수 있습니다. 이를 해결하기 위한 방법이 몇 가지 있습니다.
1. POST요청의 결과값을 이용해 state 업데이트하기
2. ref.invalidateSelf()로 provider 새로고침하기
3. local cache 직접 업데이트하기
위의 방법들은 각각 장단점이 있습니다.
차례대로 보도록 하겠습니다.
첫 번째, POST 요청의 결과값을 이용해 state 업데이트하기
  Future<void> addTodo(Todo todo) async {
    // The POST request will return a List<Todo> matching the new application state
    final response = await http.post(
      Uri.https('your_api.com', '/todos'),
      headers: {'Content-Type': 'application/json'},
      body: jsonEncode(todo.toJson()),
    );

    // We decode the API response and convert it to a List<Todo>
    List<Todo> newTodos = (jsonDecode(response.body) as List)
        .cast<Map<String, Object?>>()
        .map(Todo.fromJson)
        .toList();

    // We update the local cache to match the new state.
    // This will notify all listeners.
    state = AsyncData(newTodos);
  }
장점:
- 항상 최신 정보로 state를 유지할 수 있습니다.
- server가 모든 정보를 제공해주므로 client에서 새로운 todo를 어떻게 추가해야 할지 등을 알 필요가 없습니다.
- 한 번의 네트워크 요청만을 사용합니다.
단점:
- POST요청이 특정 값을 리턴하도록 요구합니다. 즉 서버가 동작하는 방식이 달라진다면 사용 할 수 없는 방법입니다.
- 만약 filtering / sorting 등의 복잡한 로직이 포함된다면 비용이 증가 할 수 있습니다.
두 번째, ref.invalidateSelf()로 provider 새로고침하기
  Future<void> addTodo(Todo todo) async {
    // We don't care about the API response
    await http.post(
      Uri.https('your_api.com', '/todos'),
      headers: {'Content-Type': 'application/json'},
      body: jsonEncode(todo.toJson()),
    );

    // Once the post request is done, we can mark the local cache as dirty.
    // This will cause "build" on our notifier to asynchronously be called again,
    // and will notify listeners when doing so.
    ref.invalidateSelf();

    // (Optional) We can then wait for the new state to be computed.
    // This ensures "addTodo" does not complete until the new state is available.
    await future;
  }
장점:
- 첫 번째 방법과 마찬가지로 항상 최신상태로 state를 유지하며, clien는 새로운 todo를 어떻게 추가해야 할지 등을 알 필요가 없습니다.
- 첫 번째 방법과는 다르게 서버로부터 POST요청의 반환값을 사용하여 cache를 업데이트하지 않기 때문에 서버가 요청을 처리하는 방식이 달라져도 괜찮습니다.
단점:
- 위의 주석에서 설명했듯이 ref.invalidateSelf()는 새롭게 state 를 build합니다. 즉 POST요청 이후 GET 요청을 한번 더 실행합니다. 네트워크 요청이 많아져서 좋을게 없죠.
세 번째, local cache 직접 업데이트하기
  Future<void> addTodo(Todo todo) async {
    // We don't care about the API response
    await http.post(
      Uri.https('your_api.com', '/todos'),
      headers: {'Content-Type': 'application/json'},
      body: jsonEncode(todo.toJson()),
    );

    // We can then manually update the local cache. For this, we'll need to
    // obtain the previous state.
    // Caution: The previous state may still be loading or in error state.
    // A graceful way of handling this would be to read `this.future` instead
    // of `this.state`, which would enable awaiting the loading state, and
    // throw an error if the state is in error state.
    final previousState = await future;

    // We can then update the state, by creating a new state object.
    // This will notify all listeners.
    state = AsyncData([...previousState, todo]);
  }
장점:
- 두 번째 방법과 마찬가지로 서버가 요청을 처리하는 방식이 달라져도 괜찮습니다.
- 두 번째 방법과 다르게 네트워크 요청은 한번만 일어납니다.
단점:
- state가 서버의 정보와 항상 같지 않을 수 있습니다.
- 서버가 todo를 저장하는 방식을 알고 있어야 하기 때문에 복잡도가 증가 할 수 있습니다.
ProviderObserver
Provider에서 발생하는 이벤트들, 에러들을 보기 위해서는 ProviderObserver를 사용하면 됩니다.
Provider에서 발생하는 이벤트들에는 다음과 같은 것들이 있습니다.
- didAddProvider : provider가 tree에 추가 되었을 때
- didUpdateProvider : provider가 update되었을 때
- didDisposeProvider : provider가 해제(dispose) 되었을 때
- providerDidFail : async provider가 에러를 반환했을 때
ProviderObserver 만들기
class MyObserver extends ProviderObserver {
void didAddProvider(
ProviderBase<Object?> provider,
Object? value,
ProviderContainer container,
) {
print('Provider $provider was initialized with $value');
}
void didDisposeProvider(
ProviderBase<Object?> provider,
ProviderContainer container,
) {
print('Provider $provider was disposed');
}
void didUpdateProvider(
ProviderBase<Object?> provider,
Object? previousValue,
Object? newValue,
ProviderContainer container,
) {
print('Provider $provider updated from $previousValue to $newValue');
}
void providerDidFail(
ProviderBase<Object?> provider,
Object error,
StackTrace stackTrace,
ProviderContainer container,
) {
print('Provider $provider threw $error at $stackTrace');
}
}만든 ProviderObserver를 사용하기 위해서는 다음과 같이 앱의 최상단에서 등록해주면 됩니다. ProviderScope에 등록
runApp(
  ProviderScope(
    observers: [
      MyObserver(),
    ],
    child: MyApp(),
  )
);
혹은 ProviderContainer에 등록
final container = ProviderContainer(
  observers: [
    MyObserver(),
  ],
);
Using riverpod
Install
flutter pub add flutter_riverpod
flutter pub add riverpod_annotation
flutter pub add dev:riverpod_generator
flutter pub add dev:build_runner
flutter pub add dev:custom_lint
flutter pub add dev:riverpod_lint
ProviderScope
void main() async {
	WidgetsFlutterBinding.ensureInitialized();
	await Firebase.initializeApp(
    options: DefaultFirebaseOptions.currentPlatform,
  );
  runApp(const ProviderScope(child: MyApp()));
}
Define model
class Journal {
  final String title;
  final String content;
  final String image;

  Journal(this.title, this.content, this.image);

  Journal.fromJson(Map<String, dynamic> json)
      : title = json['title'] as String,
        content = json['content'] as String,
        image = json['image'] as String;
}
Define Provider
Future<List<Journal>> journal(Ref ref) async {
final db = FirebaseFirestore.instance;
final journal = db.collection("journals").doc('KFq6AjljeCt60J2Evabr');
final result = await journal.get().then((DocumentSnapshot doc) {
final json = doc.data() as Map<String, dynamic>;
final journalModel = Journal.fromJson(json);
return journalModel;
});
return [result];
}하드코딩된 위젯 리팩토링 StatelessWidget -> ConsumerWidget
BEFORE
class _Content extends StatelessWidget {
const _Content({super.key});
Widget build(BuildContext context) {
final TextStyle textStyle = TextStyle(
color: Colors.grey.shade600,
fontWeight: FontWeight.bold,
);
return Center(
child: Column(
mainAxisAlignment: MainAxisAlignment.center,
children: [
Image.asset("assets/icons/LogoTemp.png"),
const SizedBox(
height: 15,
),
Text("일지를 작성해보세요", style: textStyle),
],
),
);
}
}class CardSingle extends StatefulWidget {
const CardSingle({super.key});
State<CardSingle> createState() => _CardSingleState();
}
class _CardSingleState extends State<CardSingle> {
String? imageURL;
final double innerPadding = 12.0;
Future<void> _fetchImageURLs() async {
final storageRef = FirebaseStorage.instance.ref();
final String url =
await storageRef.child('/grapeFarm.jpg').getDownloadURL();
setState(() {
imageURL = url;
});
}
void initState() {
super.initState();
_fetchImageURLs();
}
Widget build(BuildContext context) {
final ColorScheme colorScheme = Theme.of(context).colorScheme;
return Column(
mainAxisAlignment: MainAxisAlignment.center,
crossAxisAlignment: CrossAxisAlignment.start,
children: [
_UpperDatePortion(
padding: innerPadding,
child: const Text(
"오늘",
style: TextStyle(fontWeight: FontWeight.bold, fontSize: 18),
),
),
ConstrainedBox(
constraints: const BoxConstraints(maxHeight: 250, maxWidth: 325),
child: Card(
color: colorScheme.surface.withOpacity(0.5),
elevation: 3.0,
child: Column(
crossAxisAlignment: CrossAxisAlignment.start,
children: [
_ImagePortion(padding: innerPadding, url: imageURL),
_TextPortion(
padding: innerPadding,
child: RichText(
maxLines: 3,
overflow: TextOverflow.ellipsis,
text: TextSpan(
style: TextStyle(color: colorScheme.onSurfaceVariant),
text:
"Lorem ipsum dolor sit amet, consectetur adipiscing elit. In neque quam, pellentesque eu nisl a, posuere posuere lacus. Orci varius natoque penatibus et magnis dis parturient montes, nascetur ridiculus mus. ")),
),
const Spacer(),
const Divider(
indent: 12,
endIndent: 12,
),
_DatePortion(
padding: innerPadding,
date: DateTime.now(),
onEdit: () => debugPrint("Hello"),
)
],
),
),
)
],
);
}
}AFTER
class _UserContent extends ConsumerWidget {
Widget build(BuildContext context, WidgetRef ref) {
final journals = ref.watch(journalProvider);
return ListView(
shrinkWrap: true,
padding: const EdgeInsets.only(top: 4.0),
children: switch (journals) {
AsyncData(:final value) => [
for (var journal in value)
Padding(
padding: const EdgeInsets.only(top: 4.0),
child: Center(
child: CardSingle(
title: journal.title,
content: journal.content,
createdAt: journal.createdAt,
image: journal.image),
),
)
],
AsyncError() => [const Text("Oops! Something went wrong")],
_ => [const CircularProgressIndicator()]
});
}
}class CardSingle extends StatelessWidget {
const CardSingle(
{super.key, this.createdAt, this.title, this.content, this.image});
final double innerPadding = 12.0;
final Timestamp? createdAt;
final String? title;
final String? content;
final String? image;
Widget build(BuildContext context) {
final ColorScheme colorScheme = Theme.of(context).colorScheme;
return Column(
mainAxisAlignment: MainAxisAlignment.center,
crossAxisAlignment: CrossAxisAlignment.start,
children: [
_UpperDatePortion(
padding: innerPadding,
child: Text(
"${DateTime.parse(createdAt!.toDate().toString()).day}일",
style: const TextStyle(fontWeight: FontWeight.bold, fontSize: 18),
),
),
ConstrainedBox(
constraints: const BoxConstraints(maxHeight: 270, maxWidth: 325),
child: Card(
color: colorScheme.surface.withOpacity(0.5),
elevation: 3.0,
child: Column(
crossAxisAlignment: CrossAxisAlignment.start,
children: [
_ImagePortion(padding: innerPadding, url: image),
title != null
? Padding(
padding: EdgeInsets.symmetric(horizontal: innerPadding),
child: Text(
title!,
style: const TextStyle(
fontSize: 15,
fontWeight: FontWeight.bold,
),
),
)
: const SizedBox(width: 0, height: 0),
_TextPortion(
padding: innerPadding,
child: RichText(
maxLines: 3,
overflow: TextOverflow.ellipsis,
text: TextSpan(
style: TextStyle(color: colorScheme.onSurfaceVariant),
text: content)),
),
const Spacer(),
const Divider(
indent: 12,
endIndent: 12,
),
_DatePortion(
padding: innerPadding,
date: DateTime.now(),
onEdit: () => debugPrint("Hello"),
)
],
),
),
)
],
);
}
}